Safe lifting
By Doosan Infracore Construction Equipment America
Features Tech tipsThe versatility of hydraulic excavators is virtually unmatched in the world of construction equipment.
The versatility of hydraulic excavators is virtually unmatched in the world of construction equipment. Whether you are talking about compact, mid-range or large excavators, these do-it-all machines can take on a variety of jobs by switching among dozens of attachments.
 |
|
| Helping your customers understand how to use excavators for lifting will increase your equipment’s value to them and help ensure everything, and everyone, comes back in one piece.
|
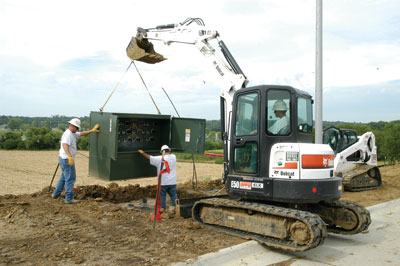
Other than digging, one of the most frequent – and overlooked – tasks performed by hydraulic excavators is lifting. On the jobsite, excavators are called on to lift, move and place a wide range of materials. As a result, learning to lift safely is a primary concern for every contractor who owns or operates a hydraulic excavator.
Let’s begin with the basics:
The lifting capacity of any hydraulic excavator, be it large or small, is limited by two factors: hydraulic capacity and tipping capacity. Hydraulic capacity is the point at which the excavator runs out of hydraulic power, or stalls. Tipping capacity is just that: the point at which the excavator begins to tip or lift off the ground.
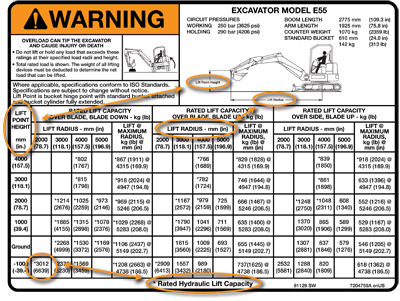
Manufacturers test excavators to determine how much weight they can safely lift at various heights and distances from the centreline of the machine. Based on these tests, they create lift charts, which are printed in the machine’s operation and maintenance manual and/or posted within sight of the operator, for example, on the canopy, cab roof, hood or window of the excavator.
It is important to spend a little time understanding how to read an excavator lift chart. At the top of the chart, there will be information indicating the machine configuration upon which the chart is based. For example, for a compact excavator, this information may include boom length, arm length, the weight of the standard bucket and the weight of the quick coupler, if standard. There may be several lift charts for a large or mid-range excavator, based on various combinations of boom length, arm length, bucket size and shoe width.
In both cases, the values on the lift charts take into account the weight of the standard bucket and the quick coupler, if standard. Typically, rated loads marked with an asterisk are limited by the machine’s hydraulic capacity and do not exceed 87 per cent of test. Rated loads without an asterisk are limited by the machine’s stability, or tipping capacity, and do not exceed 75 per cent of test.
The next thing you need to determine is the lift point height, which is in the far left column on the lift chart. The lift point height refers to the distance from the ground to the bucket pin or hook, not from the ground to the object you’re lifting. When you’re measuring the lift point height, consider how high you will need to lift the item, including the height of the item itself, the length of the lifting device (for example, a chain or a sling), and at what height you want to place the item (for example, on a trailer).
Next, determine the lifting radius from the centreline of the swing point. This distance is shown in the top row of the lift chart. At this point, you need to determine if you are lifting over the front of the excavator or over the side. In addition, if you are using an excavator with a dozer blade or outriggers, such as a wheeled excavator, you need to determine whether or not the blade or outriggers are down.
Now find the cell on the lift chart where the lift point height and lifting radius intersect. The number shown is the excavator’s lifting capacity at that point. If the cell is blank, the excavator has no lifting capacity at that point, and lifting should not be attempted.
Generally, as you move to the right on a lift chart, lifting capacity will decline. Also, with an excavator, lifting over the side is generally more limited than lifting over the front.
Be alert to jobsite considerations
Ultimately, the operator is responsible for all jobsite- and lift-related conditions, and must respond to changes in those conditions that could pose a hazard.
Before starting to lift:
- The excavator should always be on a firm, level and uniformly supporting surface. Do not attempt to lift on soft or uneven ground or slopes.
- Be sure the excavator has not been modified in any way and is well maintained.
- Always lift squarely over the side or over the end of the machine. If equipped, select the digging mode on the excavator before using the machine for lifting work.
- Avoid travelling with a suspended load, swinging it too quickly or lifting with an uneven sling.
If the surface area of the load is large enough, wind gusts can create side-load conditions. Tag lines held by workers on opposite sides of the load can help prevent side loading caused by wind gusts.
Keep the bucket hook pointed directly over the load. The load can become unbalanced if the hook line is twisted and starts to rotate. Use short slings to prevent excessive load swing.
Remember that the weight of slings and any auxiliary lifting device (and/or the weight difference of any attachment heavier than the standard configuration) must be subtracted from the rated lift capacity to determine the allowable net lifting load. Do not do any lifting with a breaker.
It is recommended that you feel your way into any lift as a precaution against tip-over. One method is to position the boom at 90 degrees over the side of the machine. Slowly lift the load until it clears the ground. A lift over the side is the most unstable, and as the load is swung into the front zone of the excavator, it will become more stable. Do not increase swing radius after the load is lifted.
Also, note that if a load is picked up from the front zone and swung into the side zone, a tip-over could result, causing a fatal injury.
Always try to maintain the lifting eye straight below the centreline of the arm and bucket pin. That way, the weight of the load is being primarily held only by the pin, and not by the bucket cylinder, link and link pins.
 |
|
| Most mini-excavators include a decal like this to inform users of the machine’s lifting capacity. Non-professionals will need to be educated on how to read the decal and apply it to their job.
|
Pick-and-carry precautions
Moving with a load, or pick and carry, requires additional precautions. When performing a pick and carry, always align the boom with the forward direction of machine travel. Maintain this boom position when turning the machine. Turn only when necessary, at the slowest speed and at a wide turning radius.
In addition, use the shortest lifting distance possible. Keep the load as close to the ground as conditions will permit. Provide tag lines to prevent the load from swinging. Swinging can cause a change in radius, and a change in radius could exceed the load chart or cause a tip-over condition. Govern travel speed to suit conditions and avoid sudden starts and stops.
Finally, if you have any questions, always consult the excavator’s operation and maintenance manual.
Print this page
Leave a Reply